개요
복잡한 TableView 의 Cell 을 구성하거나, 여러 곳에서 활용하는 복잡한 뷰를 구성할 때, 계속해서 해당 뷰를 스토리보드나 코드를 통해 작성하는 것은 매우 귀찮은 작업이다. SwiftUI 를 활용하면 아주 쉽게 재활용할 수 있는 View 를 구성 가능하다. UIKit 에선 어떻게 Custom View 를 사용해 적절히 재활용을 하고 코드를 줄일 수 있을까? xib 파일을 활용해 Custom View 를 생성해보자.
1. Xib를 활용한 방법
Xib 는 Xcode Interface Builder 의 줄임말으로, Storyboard 와 똑같이 캔버스를 활용해 View 를 구성 가능하다.
먼저 새로운 파일을 View 템플릿을 활용해 생성하자.
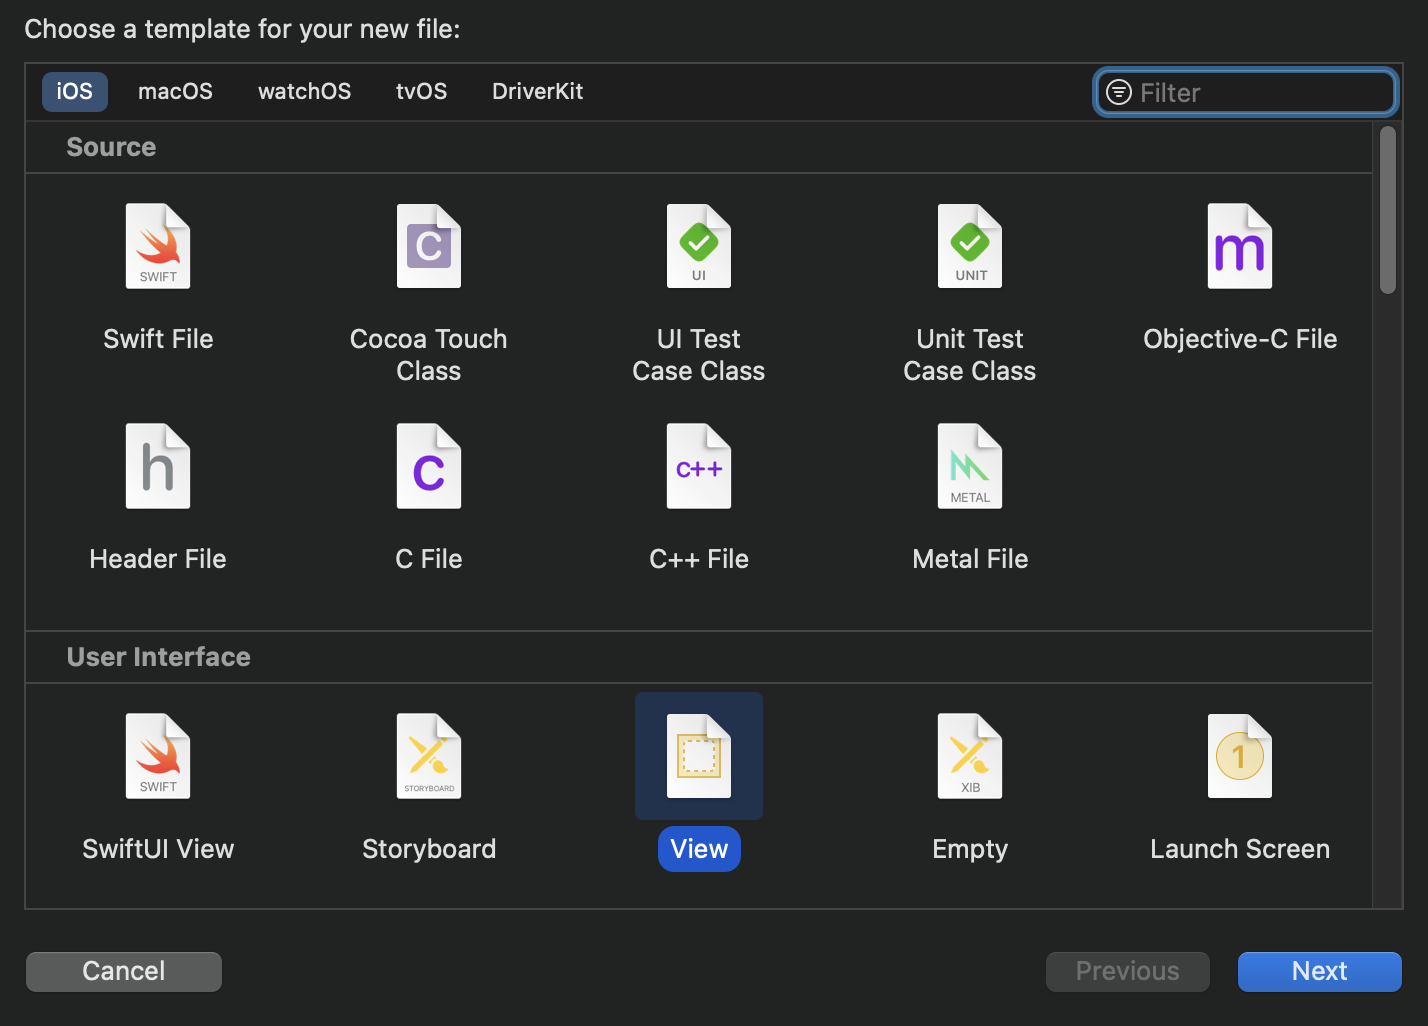
그러면 xib 확장자를 가진 파일이 생성된 것을 확인할 수 있다. 해당 파일을 들어가면 다음과 같은 화면을 볼 수 있다.

대개 커스텀 뷰를 생성할 때 시뮬레이터에 해당하는 사이즈의 캔버스가 필요없고, Safe area layout guide 도 필요없으므로 사이즈는 freeform 으로 변경하고, safe area layout guide 는 해제하도록 하자.
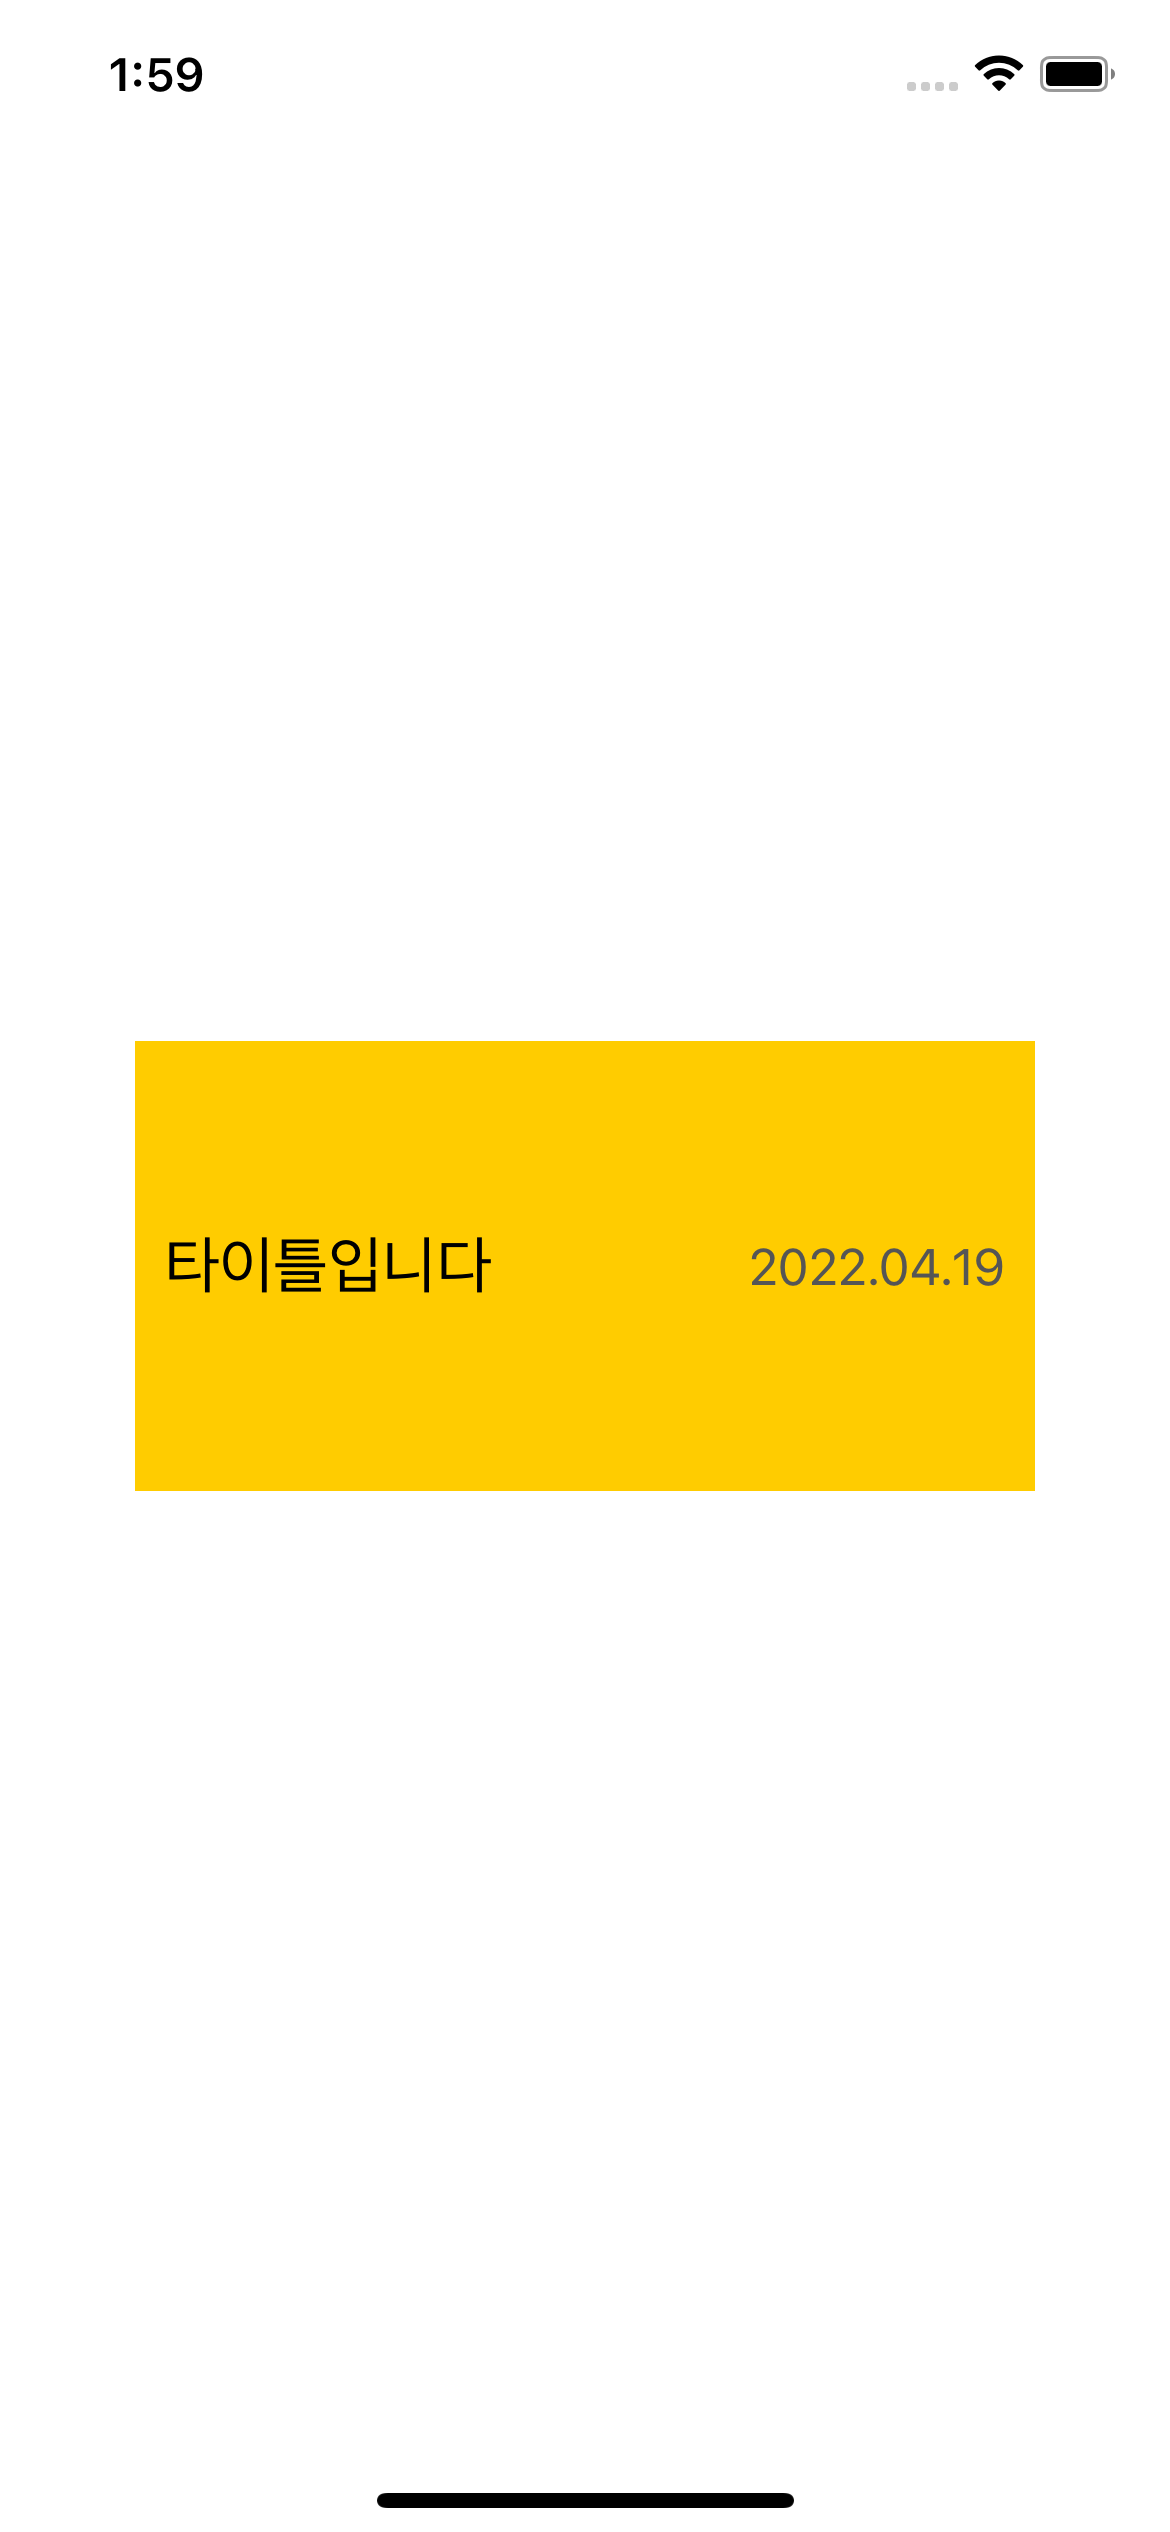
간단하게 왼쪽에 타이틀, 오른쪽에 날짜를 가지고 있는 cell 을 인터페이스 빌더를 통해 구성해보자.

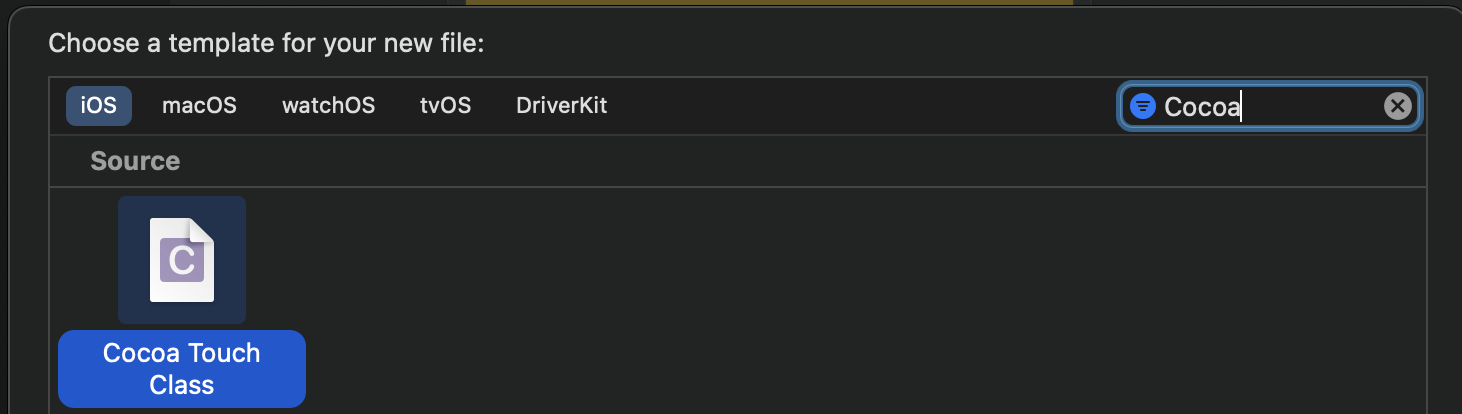
단순히 xib 파일만으로는 커스텀 뷰를 사용할 수 없다. 해당 xib 파일과 연결된 UIView 를 상속하는 클래스가 필요하다. Cocoa touch 템플릿에서 UIView 를 상속하는 새로운 클래스를 만들자.
그 다음 xib 파일로 돌아가, Identifier Inspector 에서 File owner 를 UIView 를 상속한 클래스로 지정해주자! 여기서 주의할 점이 있는데, UIView 의 custom class 를 지정해주면 안 된다.

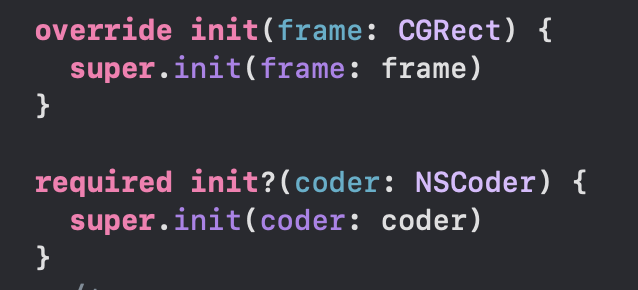
그 다음 UIView 를 상속한 클래스에서 다음과 같이 코드를 작성해주자.
class CustomCell: UIView {
  override init(frame: CGRect) {
    super.init(frame: frame)
    loadView()
  }

  required init?(coder: NSCoder) {
    super.init(coder: coder)
    loadView()
  }

  private func loadView() {
    let bundle: Bundle = Bundle(for: CustomCell.self)
    let nib = bundle.loadNibNamed("CustomCell", owner: self, options: nil)
    guard let customCell = nib?.first as? UIView else {
      fatalError("Error when load custom cell")
    }
    customCell.frame = bounds
    addSubview(customCell)
  }
}
이제 ViewController 에서, CustomCell을 생성한다음 제약 조건을 추가해주자. CustomCell 을 화면의 중앙에 배치해보았다.
let customCell: CustomCell = CustomCell()
view.addSubview(customCell)
customCell.translatesAutoresizingMaskIntoConstraints = false
NSLayoutConstraint.activate([
  customCell.centerXAnchor.constraint(equalTo: view.centerXAnchor),
  customCell.centerYAnchor.constraint(equalTo: view.centerYAnchor),
  customCell.widthAnchor.constraint(equalToConstant: 200),
  customCell.heightAnchor.constraint(equalToConstant: 100)
])
그러면 다음과 같이 화면의 중앙에 CustomView 가 잘 나타나는 것을 볼 수 있다.
StoryBoard 에서 직접 사용하기
위 예제에선 ViewController 에서 직접 CustomView 를 생성하고, view 에다가 추가해주었다. 그렇다면 스토리보드에서 직접 사용할 수 있는 방법은 없을까?
당연히 존재한다. 우리가 생성한 Custom View가 UIView 를 상속하는 class 이므로, 스토리보드에 UIView 를 추가해주자. 그리고 해당 UIView 의 custom class 를 우리가 생성한 class 로 지정해주면 Storyboard 에서 우리가 생성한 CustomView 를 사용할 수 있다.

Storyboard 에서 Custom View의 렌더링이 실패해요
단순히 위의 과정만으로 스토리보드에서 커스텀 뷰가 렌더링 되진 않는다. Storyboard 에서의 rendering 을 지원하기 위해 class 선언부 위에 @IBDesignable 어트리뷰트를 추가하자.

'UIKit' 카테고리의 다른 글
| AutoLayout - Constraint (0) | 2022.05.17 |
|---|
Comment